- Catálogos
- Depuy Synthes
- Expert Tibia Nail
Expert Tibia Nail
1 /84Páginas

Expert Tibia Nail
1 /84Páginas
Extractos del catálogo

Expert Tibial Nail Technique Guide
Abrir la página 1 del catálogo
Introduction Expert Tibial Nail 2 AO Principles of Internal Fixation 4 Surgical technique Preoperative Planning 8 Product information Implant Specifications 60 C Image intensifier control Expert Tibial Nail PROtect 79 This description alone does not provide sufficient background for direct use of Optional: Angular Stable Locking System (ASLS) 80 the instrument set. Instruction by a surgeon experienced in handling these nstruments is highly recommended Reprocessing, Care and Maintenance of Synthes Instruments Cleaning of instruments: For general guidelines, function control and dismantling of...
Abrir la página 3 del catálogo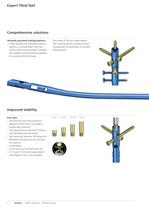
Expert Tibial Nail Comprehensive solutions Versatile proximal locking options: – Three unique and innovative locking options, in combination with cancellous bone locking screws, increase the stability of the proximal fragment for proximal third fractures. – Two state of the art medio-lateral (ML) locking options enable primary compression or secondary controlled dynamization Improved stability Stardrive® T40 as th e Synthes ® lo som ck in g with hexalobu lar in 64 106 This pa tie n Technique Guide ISO Expert Tibial Nail ws re sc EN Synthes 5 mm e according driv to 2 0 mm al rn te End caps: –...
Abrir la página 4 del catálogo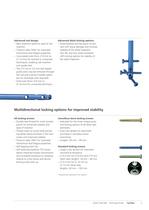
Advanced nail design: – New anatomic bend for ease of nail insertion – Titanium alloy TAN* for improved mechanical and fatigue properties – Cannulated nails (from л 8 mm to л 13 mm) for reamed or unreamed techniques, enabling nail insertion over guide wire – The 2.5 mm or 3.0 mm ball tipped guide wires may be removed through the nail and insertion handle assembly (no exchange tube required). – Solid nails (from л 8 mm to л 10 mm) for unreamed technique Advanced distal locking options: – Distal oblique locking option to prevent soft tissue damage and increase stability of the distal fragment –...
Abrir la página 5 del catálogo
AO Principles of Internal Fixation In 1958, the Association for the Study of Internal Fixation (AO) formulated four basic principles1, which have become the guidelines for internal xation in general, and intramedullary nailing in particular: The Expert Tibial Nail permits an intramedullary approach for the fixation of proximal, shaft and distal fractures of the tibia. The system consists of a series of cannulated nails, cannulated end caps, dual core locking screws and standard locking screws. All of the implants are made of titanium alloy (TAN*). Anatomic Reduction The Expert Tibial Nail is...
Abrir la página 6 del catálogo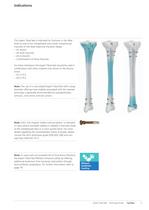
The Expert Tibial Nail is indicated for fractures in the tibial shaft as well as for metaphyseal and certain intraarticular fractures of the tibial head and the pilon tibiale: - Combinations of these fractures For these indications the Expert Tibial Nail should be used in combination with other implants (not shown in the illustra- Note: The use of a cannulated Expert Tibial Nail with a large diameter offering more stability associated with the reamed technique is generally recommended for pseudarthroses, tumours, mal-unions and non-unions. Note: ASLS, the Angular Stable Locking System, is indicated...
Abrir la página 7 del catálogo
Fracture involving the proximal component The use of the three locking screws in the proximal oblique locking options ensures optimal stabilization of the proximal fragment. The distal segment can be stabilized by using two ML locking options. Stability of the distal fragment can be enhanced by the use of a third locking screw in the AP Shaft fracture For simple shaft fractures, two proximal ML and two distal ML locking screws are normally sufficient to stabilize the fracture. Secondary dynaminization is achieved by removing the proximal static locking screw. Fracture involving the distal component...
Abrir la página 8 del catálogo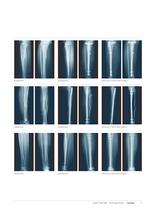
preoperative postoperative follow-up (3 months after surgery) preoperative postoperative follow-up (4 weeks after surgery) Expert Tibial Nail Technique Guide Synthes 7
Abrir la página 9 del catálogo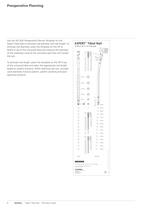
Preoperative Planning TM EXPERT Tibial Nail for Ø 8, 9, 10, 11, 12, 13 mm nails 15 10 5 0 mm 40 50 To estimate nail length, place the template on the AP X-ray of the uninjured tibia and select the appropriate nail length based on patient anatomy. When selecting nail size, consider canal diameter, fracture pattern, patient anatomy and postoperative protocol. dynam 04.004.0 03 04.004.0 02 04.004.0 01 04.004.0 00 (04.004.0 04) ic 7 mm 30 Cancellous Bone Locking Screw Ø 5.0 mm (golden) 04.015.5XX 0 mm Use the AO ASIF Preoperative Planner Template for the Expert Tibial Nail to estimate nail diameter...
Abrir la página 10 del catálogo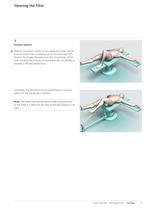
Position patient C Position the patient supine on the radiolucent table. Ensure that the knee of the injured leg can be flexed at least 90°. Position the image intensifier such that visualisation of the tibia including the articular surface proximally and distally is possible in AP and lateral views. Optionally, the procedure can be performed on a fracture table with the leg placed in traction. Note: The knee roller can be placed under the lower part of the thigh if it obstructs the view of the tibia plateau in AP Expert Tibial Nail Technique Guide Synthes
Abrir la página 11 del catálogo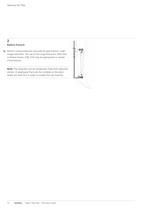
Reduce fracture Perform closed reduction manually by axial traction under mage intensifies The use of the Large Distractor (394.350) or Pinless Fixator (186.310) may be appropriate in certain Note: The reduction can be temporarily fixed with reduction clamps. In epiphyseal fractures the condyles or the pilon tibiale are fixed first in order to enable the nail insertion. 10 Synthes Expert Tibial Nail Technique Guide
Abrir la página 12 del catálogo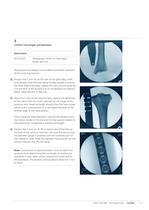
3 Confirm nail length and diameter Instrument 03.010.021 Radiographic Ruler for Tibial Nails, length 450 mm The required nail length must be determined after reduction of the lower leg fracture. Position the C-arm for an AP view of the distal tibia. With long forceps, hold the ruler along the leg, parallel to and at the same level as the tibia. Adjust the ruler until the distal tip is at the level of the physeal scar or the desired nail insertion depth. Mark the skin at that site. Move the C-arm to the proximal tibia, replace the distal end of the ruler at the skin mark, and take an AP image...
Abrir la página 13 del catálogoTodos los catálogos y folletos técnicos Depuy Synthes
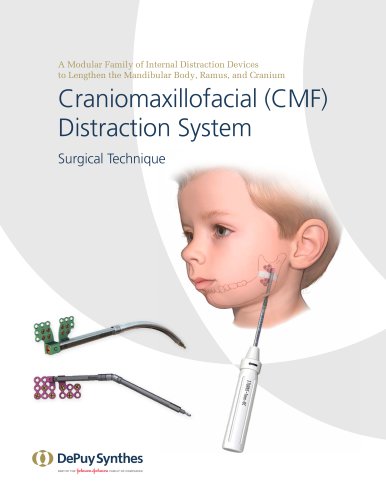 Craniomaxillofacial (CMF) Distraction System
100 Páginas
 Titanium Sternal Fixation System
34 Páginas
 Small Battery Drive II
4 Páginas
 Introducing The Variable Angle
12 Páginas

Catálogos archivados
 MatrixRIB®FixationSystem
86 Páginas
 HEALIX ADVANCE
4 Páginas
 HEALIX Anchor™ 3.4 mm
2 Páginas
 VA LCP ® Distal Radius System
8 Páginas
 External Midface Distractor System
43 Páginas
 3.5 mm LCP™ Medial
15 Páginas
 RADIUS OF CURVATURE
3 Páginas
 Building on Success
16 Páginas
 2.0 mm LCP® Distal Ulna Plate
20 Páginas
 2.4 mm VA LCP™
4 Páginas
 Mandible Trauma Solutions
2 Páginas
 Power line II
4 Páginas
 Concorde
28 Páginas
 LCP Intercarpal
31 Páginas
 LCS® COMPLETE™
2 Páginas
 Cementing Total Knee Replacements
12 Páginas
 CORAIL® Hip System Design Rationale
12 Páginas
 Synthes TPLO.
8 Páginas
 SynFix-LR System
56 Páginas
 ATB Anterior Tension Band Plate
32 Páginas
 CONDUIT™
15 Páginas
 Brochure_FINAL
2 Páginas
 DePuy Synthes
81 Páginas
 Anspach
3 Páginas
 Orthopedic Foot Instruments
32 Páginas
 PINNACLE® Hip Solutions
12 Páginas
 Corail
24 Páginas
 GLOBAL Advantage Surgical Technique
32 Páginas
 S-ROM® NOILES™
68 Páginas
 TRI-LOCK® Product Rationale
12 Páginas
 Reclaim Surgical Technique
44 Páginas
 DESIGN RATIONALE AND SURGICAL TECHNIQUE
28 Páginas
 PRODUCT RATIONALE AND SURGICAL TECHNIQUE
32 Páginas
 Speed
Speed2 Páginas
 attune
80 Páginas
 HAMMERLOCK® 2
2 Páginas
 DePuy Glenoid Solutions
2 Páginas
 Trauma Solutions. Elbow
4 Páginas
 Polar
Polar4 Páginas
 Alveolar Distractor.
4 Páginas
 Piezoelectric System
4 Páginas
 Air Power Line II
6 Páginas
 LCP Clavicle Hook Plate
4 Páginas
 TruMatch Pin Guides
16 Páginas
 P F N A
8 Páginas
 SKILL, DEDICATION,
16 Páginas
 Orthopaedics. Overview
20 Páginas
 DURALOC
16 Páginas
 Marathon Cemented Cup
20 Páginas
 REEF Surgical Technique
16 Páginas
 MatrixNEURO
8 Páginas
 Anspach XMax
4 Páginas
 Anspach eMax 2 Plus
4 Páginas
 Small Electric Drive
4 Páginas
 Air Pen Drive
4 Páginas
 Colibri II
4 Páginas
 Spine
Spine25 Páginas
 Epoca Shoulder Arthroplasty System
8 Páginas
 VA-LCP Elbow Plating System Promotional
12 Páginas
 MultiLoc Humeral Nailing System.
4 Páginas
 Headless Compression Screws 4.5 & 6.5
28 Páginas
 Expert Hindfoot Arthrodesis Nail
48 Páginas
 LCP Distal Fibula Plates
32 Páginas
 LCP Distal Tibia Plate - Low Bend
24 Páginas
 TomoFix
60 Páginas
 Expert Tibial Nail PROtect
16 Páginas
 Sacral Bars
16 Páginas
 Pelvic C-Clamp
20 Páginas
 Low Profile Pelvic System
16 Páginas
 Proximal Femoral (Hook) Plate
24 Páginas
 LCP
LCP24 Páginas
 PFNA
PFNA112 Páginas
 HCS 1.5, 2.4, 3.0
36 Páginas
 LCP Wrist Fusion
32 Páginas
 LCP Compact Hand
28 Páginas
 VA-LCP Elbow
48 Páginas
 Distal Radius
44 Páginas
 Olecranon
30 Páginas
 LCP Hook Plate
28 Páginas
 DHP & Olecranon
4 Páginas
 LCP S-A
4 Páginas
 Epoca
Epoca4 Páginas
 Philos
32 Páginas
 MultiLoc
68 Páginas


- Placa ósea DePuy Synthes
- Placa de compresión
- Placa de compresión metálica
- Placa de compresión bloqueada
- Placa de compresión de titanio
- Placa de compresión porción distal
- Kit de instrumentos para cirugía ortopédica
- Caja intersomática
- Contenedor de esterilización
- Contenedor de esterilización para instrumental
- Sustituto óseo
- Clavo médica
- Clavo intramedular metálico
- Caja intersomática vía anterior
- Vástago femoral
- Placa de artrodesis
- Sustituto óseo para cirugía ortopédica
- Clavo intramedular para fémur
- Placa de artrodesis metálica
- Anclaje de sutura